
Camera geometry, the way photographs overlap, is an important factor in successful mapping when using Structure-from-Motion (SfM). There are several main geometries that photosets fall into: divergent, convergent, parallel, and whether the camera is pointed at a nadir or oblique angles. The type of geometry you use is dependent on the research question and there is always going to be some natural variation in a photoset but you should attempt to keep a consistent overall geometry in the scene. These are simply guidelines, one of the beautiful things about SfM is that is can be forgiving, so if you do not take perfectly aligned photos your 3D model will not be lost. Also, I cannot stress the important of practice. Before you head out for a full field campaign find an analog to your study site and practice taking photographs using the different camera geometry guidelines. This will help you plan for the field and also let you experiment with the processing workflow and familiarize yourself with how the software behaves.
The
first geometry to consider is oblique versus nadir. The nature of your mapping
exercise and what your final product will be will determine which you use.
Generally the camera should be perpendicular to the surface/object imaged, so
the more vertical the scene is, the more oblique the images. Flat surfaces
should be mapped using a nadir viewpoint which gives the best coverage and provides
for the best vertical resolution in the final model. Nadir viewpoints can be
achieved in a variety of ways: over small areas (less than a couple square
meters) can be done with a handheld camera pointed down at the ground, medium
sized areas (hundreds of square meters) can be mapped with a camera mounted on
a mobile pole (12-16 feet / 4-5 meters tall), and larger areas require balloons,
radio controlled or manned aircraft. For vertical surfaces/objects oblique
imagery will be needed to create a more complete 3D model. Oblique imagery can
be collected by any of the aforementioned platforms and again the size of the
area that needs to be mapped will dictate the platform. No natural scene falls
neatly into these two categories and so part of the decision should be based on
what the final output of the SfM process is going to be. If the outputs are
going to be traditional raster (DEM) formats, nadir imagery is usually the best
option, but if the results of SfM are going to be truly 3D data like point
clouds or TIN meshes, oblique imagery will better represent the scene. My go to
platform is pole photography with the camera pointed off-nadir by about 10 – 20
degrees which is a bit of the best of both worlds.
The
second geometry component is whether the photographs are divergent, convergent
or parallel to the scene. This geometry affects the overlap between photos and
ultimately the all important parallax between photos. The worst camera geometry
for SfM are divergent photos. By taking multiple photos spread out from a
single point, the parallax between photos is almost zero and creates a lot of
problems for SfM. Multiple overlapping divergent photosets of a scene adds
parallax, but in my experience leads to more error filled results. Parallel
photosets, think aerial photography flight lines, and are perfectly adequate
for SfM if each photo overlaps the last by at least 60% to optimize the overlap
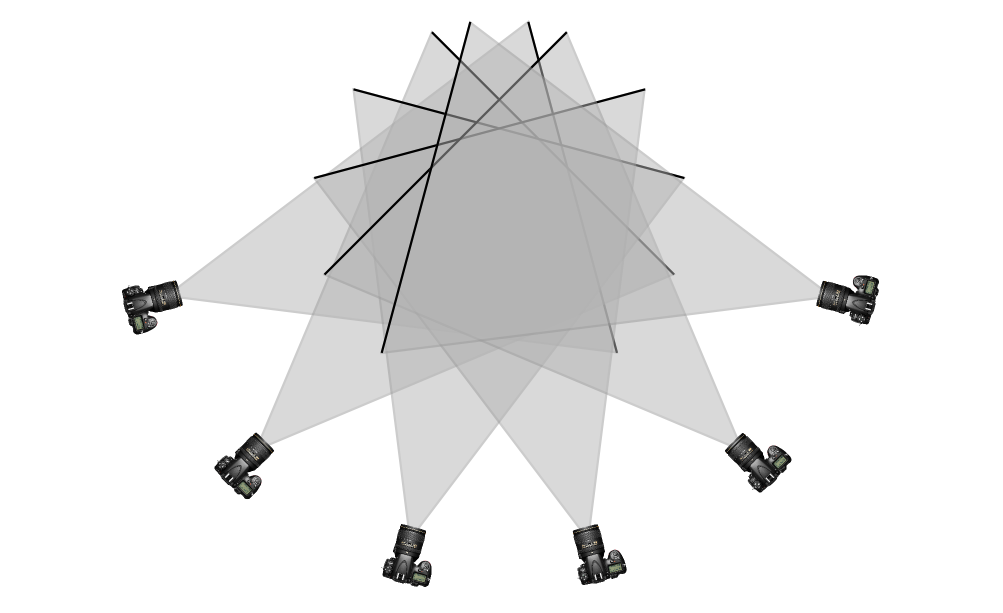
and parallax. Convergent photos, where the photos are all focused on a central
point in the scene, have produced some of the best models. The convergent
geometry maximizes both overlap and parallax. For larger areas parallel photos
are probably the most efficient and for smaller areas or single objects
convergent photos produce the best results.
 |
| Convergent Views |
 |
| Divergent Views |
 |
| Parallel Views |
Any SfM project will inevitably be a mash up of all of the geometries above, and it is important to remember that SfM is forgiving but cannot fill in gaps from missing photos or bad geometry. It is important to practice and be systematic about your photo collection so that you minimize your errors. A last note on the number of photos to collect for a given area, there is no table that I can produce that will show how many photos you need for a given area. I have made successful SfM models from as few as three photos and as many as 300. If there are two rules I follow, they are to cover the area of interest with photos that are at your desired ground resolution (higher is not always better, and is a topic for a different discussion) and the other is that your if photos overlap each other, they should play back like a stop-motion animation.
I normally map using nadir and as you mention in your post, it delivers great results for large areas. Also, I fly the drone in a parallel way and I noticed I get around %80+ overlap and with over 300 images depending on the area. This makes my phoroscan models run a little slower but I get great results. I will try some of the other techniques you mention in future projects. Thanks
ReplyDeleteBIM or building information modeling is the process that gives the insight and tools to more efficiently plan, design, construct, and manage buildings and infrastructure. BIM modeling can help you to reduce the construction time & cost at a time. If you need the best BIM modeling service then you can contact Onsite3D. BIM Grand Prairie, Alberta
ReplyDeleteOur writers provide best quality Mathematics Dissertation Help. For us, mathematics is not only limited to logic and calculations but an extra-ordinary domain of intelligence.
ReplyDelete