The instructions for the previous version 1.0 are still here…
I also have discussions on cameras and camera geometry.
Jump to a section:
Photo Prep | Geotagging | Photo Alignment | Georeferencing | Optimize the alignment
Building Dense Point Cloud | Point Cloud Editing | Aligning the Bounding Box | Build Mesh
Build Texture | Exporting Point Clouds | Exporting DEMs / Orthophotos
Photo Prep
Eliminate any blurry, out of focus, or random photos from your photoset- I like to do this step by hand, just to ensure that everything looks OK
- Photoscan also has a tool, “Estimate Image Quality”, which can take some of the guesswork out of large datasets.
- Load your photos, select all of them, right-click on one and choose “Estimate Image Quality”.
- Switch to the ‘Detail’ view in the Photo pane to see the quality score from 0 to 1. I have found that images with scores less than 0.6 are good candidates for removal (the documentation says less than 0.5).

Getting the Details view - Removing photos is a bit of a double-edged sword. If you do not remove poor photos, you risk getting incorrect alignments and by removing photos, you risk not getting a complete alignment. The hope is that your photoset has sufficient overlap to mitigate the effects of a few missing photos.

Geotagging
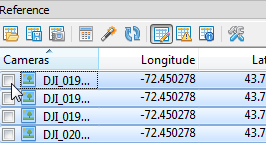
If you have geotagged photos (from a camera with automatic geotagging or from a UAV/UAS)- If you have a synced GPS track for you photos, use a program like GeoSetter to geotag your photos before processing.
- With geotagged photos, the coordinates are usually Lat/Long (in degrees); use the convert tool in the “Reference” pane to convert to UTM (or your coordinate system of choice).
- Never use geotagged photos as the sole source of georeferencing information. The error in consumer grade GPS units (handheld, in-camera, or UAS) is not sufficient for anything more than helping with photo alignment.
 |
| Coordinate conversion in Photoscan |
Photo Alignment
This step generates the initial alignment parameters for the photos and a sparse point cloudLoad your photos
 |
| Add photos |
- Use the ‘Add Photos’ button on the top of the Workspace pane, through the menu option in the ‘Workflow’ menu, or by right-clicking in the Photos pane
- On the top menu bar: Workflow > Align Photos
- Alignment parameters:
- Accuracy:
- High: is best for smaller photosets
- Medium: is best for larger photosets
- Accuracy:
- Pair Selection
- Disabled: default, works for most datasets
- Generic: I use this one if I am having trouble getting photos to align
- Reference: If your photos are geotagged, this will use the GPS positions to speed up processing.
- Advanced:
- Key Point Limit: 40,000 is default. Smaller numbers of key points can speed up processing, but you run the risk of not having enough points to align photos.
- Tie Point Limit: 1000 – 2000 is recommended. This is one parameter to play with if you are having alignment issues. You can even take it down to zero to have no limit.
- Constrain features by mask: If you have created masks on your photos, use this option to limit the point search to just the areas you selected.
 |
| Alignment options |
- After the initial pass of photo alignment, there may be photos that are misaligned or unaligned. You can force the program to try again, usually this works (but not always).
- Select all of the photos that are causing trouble, right-click and select “Reset Alignment”
- Right-click again, select “Align Selected Cameras”

- If that does not work, select a smaller batch of problem photos and try again working in small batches.
- A last ditch solution for problem photos is to add temporary markers in the images to help force Photoscan to match the misaligned photos
- You will need start with least two aligned images that overlap with the misaligned photo(s)
- Open the aligned photos and find features that are in both images and right-click on the aligned image and select ‘Create Marker’ to place a temporary marker in the image. Do that for 3-4 features.
- Once you have created a marker in one image, switch to the second aligned image and use the ‘Place Marker’ option in the right-click menu.
- Open the misaligned image and place the markers on the features.
- Then you can select the misaligned photo(s) and run ‘Align Selected Cameras’ again.
- You can continue the process for all the misaligned images
- ** If the markers do not seem to be helping (one-by-one), you can try to realign all the images. Either by selecting all your photos and selecting “Reset Alignment” then “Align Selected Cameras” OR by running the Align Photos tool again. MAKE A COPY OF YOUR PROJECT BEFORE YOU DO ANYTING DRASTIC LIKE THIS.
- If none of that works, there is not a whole lot you can do but disable or exclude the photos that will not align.
Georeferencing
Prep and import your ground control point (GCP) data- Double-check your projection and vertical datum.
- Photoscan has a converter, however I like to do any conversions outside of Photoscan ina fun little program called VDatum from NOAA/NGS
- Load your data points into Excel and delete all but the NAME, LAT(Northing), LONG(Easting), and ELEV fields to simplify things.
- Save as a text file (tab delimited)

GCP format in plain text file - Use the Import tool in the Reference pane,
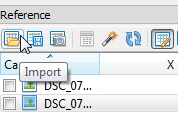
Importing GCPs - Set the coordinate system, delimiter, and choose which columns go to which values
- Double-check the preview pane at the bottom of the window to make sure your coordinate are going to the right place (be careful…some GPS outputs are Y,X,Z instead of X,Y,Z).
- It will complain that it “Can’t find match…” , click “Yes to all” to import all of the points in the file
- If you import a larger file, you should delete any points that are not present in the photoset.
- Photoscan has a converter, however I like to do any conversions outside of Photoscan in

- If you do not do this, Photoscan will try to use both the geotagged images and the in photo GCPs to georeference. This can lead to some interesting results as the software tries to reconcile the less accurate GPS data with coordinates that are more accurate.
Unchecking geotagged photos
- Find the first photo with a ground control point
- Double-click the photo to open it, zoom in on the control point, right-click on the center of the control point marker, select “Place Marker” and select the appropriate marker.

GCP marker placement - Find the next photo with the same GCP as the first, set the marker.
- Once you have a marker placed in two photos the software starts to guess where they should be in other photos.
- Right-click on the marker you have been working on, select “Filter Photos by Marker”. This will show just the photos that the marker is in.
- Go through all of the photos and place the markers.
- ** You can easily get to the next/previous photo using the PageUp/PageDown keys on your keyboard
- If a photo has a marker flag in it, but the GCP is not visible (obscured):
- You can leave it as a gray flag and it will not be used, or
- You can right-click on it and “Remove Marker”
- In the photos pane, select “Reset Filter” to get back to the full photoset.
- Repeat the above steps for the next two GCPs
- After you have three GCP markers set, you can “Update” the georeferencing in the ground control pane

Updating the georeferencing - This will roughly georeference the model and make finding the remaining GCPs easier
- If your first three points are close together, this may not work very well. In this case you will likely have to manually find and mark an additional GCP (preferably further away from the initial GCPs
- Right-click on the next GCP in the list and “Filter Photos by Marker”
- Run through all of the photos and place the markers
- “Update” again to refine the georeferencing
- Repeat this for the rest of the GCPs
- Double-check that all of your GCP markers are placed
- Right-click on each of the GCPs and “Filter Photos by Marker”
- Double-check that all of the photos have little blue flags above them in the photo pane.
- Update one last time
Optimize the alignment
Click on “Optimize” in the ground control pane- Leave the default options
- This optimizes the camera alignment and generates a camera calibration based on the GCP locations

Check your errors for each GCP
- You may need to expand the reference pane to show the error statistics for the GCPs
- You can also click on “View Errors” to view the X, Y, and Z components of the error
- If you have points with errors that are higher than you would like, you can uncheck the box on the left to exclude it from the georeferencing calculations
- Update the georeferencing, repeat for any other bad points if necessary
- Re-optimizing in between updates will also help you improve the error
- The errors reported by Photoscan are the ‘root sum of squares errors’ and the ‘root mean squared errors’ for each point.
- *** These values are only valid for the GCPs and should not be reported as the accuracy of the entire model. To judge the accuracy of the model I highly recommend that you collect independent control points that can be used to compute the overall spatial accuracy of the model. Please refer to the ASPRS POSITIONAL ACCURACY STANDARDS FOR DIGITAL GEOSPATIAL DATA for details on accuracy assessments.
 |
| Explanation of the different error values in Photoscan |
Building the Dense Point Cloud
 | ||
| Resize and Rotate | Region tools |
- Use the “Resize Region” and “Rotate Region” tools on the toolbar if the bounding box looks like it is going to cut off any parts of the model
Settings
- Quality:
- High: great for smaller photosets
- Medium: good for larger datasets
- Lowest, Low: produce low quality results (not usually the goal)
- Ultra High: I have only ever tried this once and my computer run out of memory.
- This is the super memory intensive part of the process, photosets that are large (lots of photos) can take a long time to complete. Too many photos cause the program to run out of memory. The quality that is achievable and the time it takes depend on your processor (CPU), RAM, and video card (GPU).
- Advanced
- Depth Filtering: Aggressive (default), limits points that are too far from the surface. For some vegetation applications, this may need to be relaxed a bit.
 |
| Dense reconstruction options |
Point Cloud Editing
 |
| Point selection tools |
- If there are any points in the dense point cloud are outside of the envelope you wish to export, you can manually delete them
- Use the “Rectangle Selection”, “Circle Selection”, or “Free-from Selection” tools on the toolbar to select and delete errant points.
- You can hold the Control key on our keyboard to add to a selection OR hold the Shift key to subtract from a selection
- Point Cloud Classification
- Photoscan has a tool to automatically classify the point cloud into “ground” and “non-ground” classes (similar to lidar data). You can also select points and manually assign a class.
- Tools menu > Dense Cloud
Aligning the Bounding Box
- For geography applications, a height field mesh would normally be modeled orthogonal to the Z-axis of the coordinate system. In Photoscan, the height field is actually modeled against the orientation of the bounding box (the light gray box with a red bottom) of the model. You can run a Python script (**Align Bounding Box Tool**) in the console or from Tools > Run Script… to align the bounding box to the reference coordinate system.
- Download the Script here https://github.com/geojames/photoscan
- There are scripts for Photoscan version 1.1 (PS110…) and version 0.9 (PS090…)
- There are some other fun scripts there too.
Build Mesh
Mesh Settings- Surface Type:
- Height Field: only builds a mesh surface orthogonal to the reference system Z-axis (i.e. no undercuts will be modeled). This is the fastest mesh procedure and excellent if DEMs are going to be your final product.
- Arbitrary: Will model every nook and cranny of the object. Best for oblique imagery, when point clouds or complex mesh surfaces are going to be the final product.
- Source Data:
- Dense cloud: default
- Sparse cloud: I am not sure why you would use the sparse cloud, but you could…
- Polygon Count: The number of polygons that the model will be decimated to after processing.
- The software has High, Medium, Low values
- Or you can specify a custom number (entering 0 will not decimate the final model)
- Interpolation
- Enabled: default, will interpolate over small holes in the surface
- Disables: no interpolation will be done
- Extrapolation: will interpolate the surface and then extrapolate out to fill the bounding box.
- Point Classes:
- If you used it to classify the dense point cloud, you could specify which point classes you want use for the mesh.
 |
| Build Mesh options |
Build Texture
This step is not totally necessary, unless you will be exporting the 3D model (as a PLY or OBJ) to a 3D graphics program. I will give the settings I use the most here; there are tons of other options. If you are interested check out the user manual.Settings:
- Mapping Mode:
- Adaptive Orthophoto: I recommend this mode for most 3D models that you will be exporting. It gives the best results for Arbitrary meshes.
- Blending Mode:
- Mosaic (Default): This will create a mosaic from the input photos
- Texture size/count:
- This determine the resolution of the texture map. Higher means better resolution, but also increased file size.
- The default is 2046 and I usually double that to 4092.
- Enable Color Correction:
- I usually leave this unchecked.
 |
| Build Texture options |
Exporting Point Clouds
- From the File menu, you can export the sparse or dense point clouds.
- I recommend that you export in the LAS format, keep the coordinate system that you georeferenced everything in, and keep the default export parameters.
- For super big point clouds you can enable the ‘Split in Blocks’ option to tile the point cloud.
- The LAS files can be viewed in software like CloudCompare or FugroViewer
- I would not recommend trying to load a dense point cloud into a program like ArcMap (it really doesn’t like dealing with datasets like this)
Exporting DEM / Orthophotos
File > Export DEM > Export TIFF/BIL/XYZ- Choose your projection
- Crop invalid DEM: checked by default
- No-data value: Use -9999 for ArcGIS
- Pixel Size: Photoscan estimates an appropriate pixel size, can be changed to match your requirements
- Split in blocks: segment the DEM into X by X rasters (only needed for large datasets)
- Set boundaries:
- Check the box and click “Estimate”, this limits extra no-data values on the edges
- Write world file: not necessary if you export a TIFF
- Choose your output location, file name, and type
File > Export Orthophoto > Export JPEG/TIFF/PNG
- Choose your projection
- Blending mode: Mosaic (default)
- Enable Color Correction: not usually necessary, but if you need the color to be evened out feel free to select this option
- Pixel Size: same as above
- Split in Blocks: same as above
- Set boundaries: same as above
- Write world file: not necessary if you export a TIFF
- Choose your output location, file name, and type
Finally all done!!!
If you are taking your orthophoto outputs into ArcMap (or any other GIS/RS software) there are some settings that Arc will default to that will make the orthophoto way to bright.- Open the Properties of the image, switch to the Symbology tab
- Select 'None' for the stretch type
- Uncheck 'Apply Gamma Stretch'
Great article. Thx for sharing.
ReplyDeleteBest info I've found on the settings. Thanks, this really helped me a lot :)
ReplyDeleteOne of the best informative article i have found ever for the photoscan.
ReplyDeleteIt's a very helpful website! I'm very pleased to read this article!
ReplyDeleteI'd like to thank you as well! Viewing the Agisoft's web site, tutorials, and help files was not getting me the aid I needed in referencing my GCPs. Your article walked me through it much better than theirs. Thanks again.
ReplyDeleteBeen Playing with PhotoScan for a while now.... I compliment you on a very Nice tutorial...
ReplyDeleteReally appreciate your work. Thanks
ReplyDeleteThank..Really good article.
ReplyDeleteIt's a very helpful tutorial! Keep up the good work, thanks!
ReplyDeleteHello.
ReplyDeleteWhen generating orto rher are 2 options. One planar and another in geographic. Whats the diference and whats the use for both?
Thnx
Very good tutorial. Thank you for sharing.
ReplyDeleteI have gone through the site and read all blogs and this is a nice one:
ReplyDeleteDrone UAV Inspection Service
hi can you explainn me what mean XY error ? and why agisoft conbined X and Y in one Error ?
ReplyDeleteHas anyone had issues with their exported DEM while trying to work with it in ArcGIS? I am unable to create a Hillshade from my DEM TIFF.
ReplyDeleteSuch a nice blog Thanks for sharing information Facebook keeps crashing
ReplyDeleteThis is realy a Nice blog post read on of my blogs It is really helpful article please read it too my blog Facebook keep crashing you can visits our websites or toll free no +1-866-558-4555. solve your problem fastly.
ReplyDeleteWow, So amazing information share this post. Actually i have Web Image Optimization Service website and this post are so help me improve for my work. I appreciate you sharing this blog article.
ReplyDeleteThanks for the post! Is it necessary to perform a pre-calibration with fiducials before running the initial alignment when working with scans of historic aerial images?
ReplyDeleteKeep up the good writing.
ReplyDeletewincracker.com
Agisoft Photoscan crack/
Keep up the good writing.
ReplyDeletewincracker.com
Agisoft Photoscan Crack
Agisoft Metashape Professional crack
ReplyDeleteI am very impressed with your post because this post is very beneficial for me.
Nice-------> Agisoft Metashape Professional Crack
ReplyDeleteGrids for Instagram Crack
Topaz Gigapixel Crack
Boom 3D Crack
VideoPad Video Editor
Idle Planet Miner Crack
Really Appreciable Article, Honestly Said The Thing Actually I liked The most is the step-by-step explanation of everything needed to be known for a blogger or webmaster to comment, I am going show this to my other blogger friends too.
ReplyDeleteagisoft-photoscan-pro-crack
So nice I am enjoying for that post as for u latest version of this Security tool Available
ReplyDeleteagisoft-photoscan-pro-crack
I like your all post. You have done really good work. Thank you for the information you provide, it helped me a lot. I hope to have many more entries or so from you.
ReplyDeleteVery interesting blog.
vstkey.com
Maxon CINEMA 4D Studio Crack
Overloud TH-U Full Crack
Mirillis Action Crack
plugin alliance all bundle Crack
I thought this was a pretty interesting read when it comes to this topic. Thank you
ReplyDeleteSSC coaching in Patna
Best Bank Po Coaching in Patna
Wonderful blog! I loved the way you gave us such information about this post. And a blog is really helpful for us for this website.
ReplyDelete3d hologram fan
Download Software for PC & Mac
ReplyDeleteYou make it look very easy with your presentation, but I think this is important to Be something that I think I would never understand
It seems very complex and extremely broad to me. I look forward to your next post,
Mocha Pro Crack
BeeCut Crack
Blue-Cloner Crack
Sublime Text Crack
Video Copilot Element Crack
PyCharm Pro Crack
Resharper Crack
Agisoft Metashape Pro Crack
Great work you done.
ReplyDeleteAirParrot Crack
Positive site, where did u come up with the information on this posting? I'm pleased I discovered it though, ill be checking back soon to find out what additional posts you include.경주홈케어
ReplyDelete완도홈케어
로로홈케어
로로홈케어
로로홈케어
로로홈케어
Thanks for posting this blog and its really very helpful information.
ReplyDeleteSecurity Camera Installation
Nice post! This is a very nice blog that I will definitely come back to more times this year! Thanks for the informative post. download Agisoft Metashape Professional
ReplyDelete